
티스토리 뷰
k3s 내장 traefik 사용
설정 변경이 번거로워서 따로 설치합니다.- k3s 내장 ServiceLB 는 사용하지 않습니다. MetalLB L2 모드로 대체합니다.
- k3s 내장 etcd 로 클러스터를 만듭니다.
- odroid 기기들과 x86 홈서버 (그냥 PC) 를 사용합니다.
저장공간은 OpenEBS + cStor 를 사용합니다.mayastor를 쓰고싶었으나, CPU 사용률이 아직 높은 문제가 있다네요.
Odroid 기기에는 Armbian 설치
사유: 공식 우분투 이미지는 커널 버전이 옛날이라 k3s 설치가 안 됨
(cgroups v2 요구, Odroid N2의 공식 우분투 이미지는 4.x 대임)
petitboot 로 더 최신버전 우분투를 깐다는 얘기도 있음 (1 petitboot?) (2-1, 2-2)
ufw allow
https://docs.k3s.io/advanced#ubuntu
# 공식 문서, ubuntu

sudo ufw allow 6443/tcp comment 'k3s apiserver'
sudo ufw allow from 10.42.0.0/16 to any comment 'k3s pods'
sudo ufw allow from 10.43.0.0/16 to any comment 'k3s services'
# k3s를 위한 ufw 설정
## ChatGPT한테 좀 더 시키고, 살짝 다듬음.
################
sudo ufw allow 6443/tcp comment 'k3s apiserver'
sudo ufw allow from 10.42.0.0/16 to any comment 'k3s pods'
sudo ufw allow from 10.43.0.0/16 to any comment 'k3s services'
sudo ufw allow 2379:2380/tcp comment 'k3s etcd - server to server'
sudo ufw allow 6443/tcp comment 'k3s supervisor and Kubernetes API Server - from agents to servers'
sudo ufw allow 8472/udp comment 'k3s flannel VXLAN - all nodes'
sudo ufw allow 10250/tcp comment 'k3s kubelet metrics - all nodes'
sudo ufw allow 51820/udp comment 'k3s flannel Wireguard IPv4 - all nodes'
sudo ufw allow 51821/udp comment 'k3s flannel Wireguard IPv6 - all nodes'
# https://metallb.universe.tf/
sudo ufw allow 7946/tcp comment 'k3s metallb speaker tcp'
sudo ufw allow 7946/udp comment 'k3s metallb speaker udp'
# 추가로
# https://digitalis.io/blog/kubernetes/k3s-lightweight-kubernetes-made-ready-for-production-part-1/
sudo ufw allow from 192.168.7.0/24 to any port 3260 comment 'k3s longhorn iscsi local'
# 모든 아웃바운드 트래픽을 허용
# sudo ufw default allow outgoing comment 'Allow all outbound traffic'
# ChatGPT에 의하면 기본이 허용이라고 함. 필요없는 게 맞을듯?
##################
# ufw 설정 적용
sudo ufw enable
sudo ufw reload# 내부망에서 포트 허용 (재설치를 여러번 했네요 ㅠ)
# IP 대역과 포트는 바꾸시면 됩니다.
sudo ufw allow from 192.168.1.0/24 to any port 22traefik 80, 443 변경
k8s의 네트워킹은 특정 포트가 필요하다면 시스템의 네트워크를 앞에서 가로챕니다. (참고)
80, 443에 있는 기존 서비스는 유지해야 하지만, traefik은 쓰고싶으므로 사전에 설정을 넣어둡시다.
https://docs.k3s.io/helm#customizing-packaged-components-with-helmchartconfig
sudo mkdir -p /var/lib/rancher/k3s/server/manifests/
sudo nano /var/lib/rancher/k3s/server/manifests/traefik-config-sftblw.yaml
apiVersion: helm.cattle.io/v1
kind: HelmChartConfig
metadata:
name: traefik
namespace: kube-system
spec:
valuesContent: |-
ports:
web:
exposedPort: 13080
websecure:
exposedPort: 13443k3s 설치
embedded etcd HA 로 설치하려면 --cluster-init 만 붙어있으면 됩니다.
https://docs.k3s.io/datastore/ha-embedded
첫 번째 서버
curl -sfL https://get.k3s.io | K3S_TOKEN=SFTBLW_VERY_SECRET_TOKEN sh -s - server --cluster-init --disable=servicelb --disable=traefik두, 세 번째 서버
curl -sfL https://get.k3s.io | K3S_TOKEN=SFTBLW_VERY_SECURE_SECRET sh -s - server --server https://<ip or hostname of server1>:6443 --disable=servicelb --disable=traefik토큰은 시스템에 저장되어 있으므로 오래되어서 까먹어도 상관이 없습니다. 어디있더라...
노드 연결 확인
매번 까먹는데, kubeconfig는 /etc/rancher/k3s/k3s.yaml 에 있습니다. ~/.kube/config 에 옮겨서 권한 설정해두시면 그냥 사용 가능. kubectl 자체에 프로필 기능도 있던 거 같은데 자세히는 안 알아봤습니다.
지금은 그냥 sudo 로 확인합니다.
sudo kubectl get nodesNAME STATUS ROLES AGE VERSION
hc2 Ready control-plane,etcd,master 4s v1.26.5+k3s1
moe Ready control-plane,etcd,master 83s v1.26.5+k3s1
n2 Ready control-plane,etcd,master 30s v1.26.5+k3s1지금부터는 API랑 통신하므로,
kubectl이 세팅된 아무 컴퓨터 한 대에서만 작업해도 됩니다.
MetalLB 설치, L2 모드 설정
k8s에서 로드밸런싱은 클러스터 밖의 것, 그러니까 클라우드의 로드밸런서를 씁니다.
가정에서 그럴 순 없으니까 k3s에 내장된 ServiceLB를 쓰거나, 별도로 MetalLB를 설치해서 사용합니다.
동작 방식은 다음과 같습니다. 이번엔 MetalLB L2 모드로 설치합니다.
- ServiceLB는 노드들의 IP 중 비어있는 포트의 IP를 사용합니다.
- MetalLB L2 모드는 ARP (IPv4) 프로토콜을 사용해 새로운 IP를 할당하고 주변에 알립니다.
한 기기가 모든 트래픽을 받게되긴 하지만, OpenWRT가 없는 홈 네트워크에서는 나름 적합합니다.- 기기 다운 시 다른 노드에 옮겨가는데, 몇 초? 정도의 딜레이가 있다고 봤던 거 같습니다. 그보다 짧았던가? 몰?루
- OpenWRT 지원 공유기 / 비싼 라우터가 있다면 MetalLB BGP 모드를 써보고싶네요...
MetalLB 설치
개인적으로 helm 설치를 선호합니다.
https://metallb.universe.tf/installation/
helm repo add metallb https://metallb.github.io/metallb
helm repo update
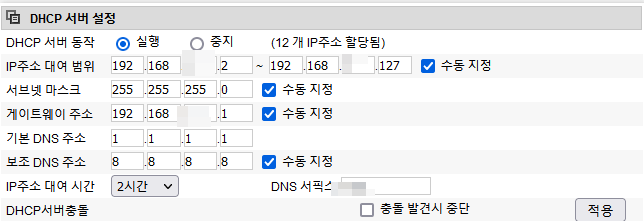
helm install metallb metallb/metallb --namespace metallb-system --create-namespace공유기의 DHCP에서 대역 비워놓기
MetalLB L2 모드가 자기네들끼리 알아서 할당해서 광고할 IP 대역을, 자동으로 할당하지 않도록 비워놓습니다.
MetalLB L2 설정 추가
위에서 비워놓은 IP 대역을 리소스로 넣어줍시다. 그리고 그 바로 밑에 --- 로 구분해서 L2 광고도 추가합니다.
apiVersion: metallb.io/v1beta1
kind: IPAddressPool
metadata:
  name: sftblw-pool
  namespace: metallb-system
spec:
  addresses:
  - 192.168.7.128-192.168.7.254 # 모자이크한 의미가 없잖아...
---
apiVersion: metallb.io/v1beta1
kind: L2Advertisement
metadata:
  name: sftblw-l2-advertisement
  namespace: metallb-system
아무 파일로 저장하고, 다음을 입력합니다.
# asdf.yml 로 저장했다고 가정합니다.
kubectl apply -f asdf.yml
traefik 설치 & cert-manager로 인증서 등록
traefik 설치
여기서부터는 처음 해봅니다. 설명이 좀 오락가락 할 수 있습니다.
참고
- https://traefik.io/blog/secure-web-applications-with-traefik-proxy-cert-manager-and-lets-encrypt/
- https://www.padok.fr/en/blog/traefik-kubernetes-certmanager
- https://github.com/traefik/traefik-helm-chart/blob/master/traefik/values.yaml
helm 차트용 traefik_values.yaml
ports:
  web:
    exposedPort: 80
  websecure:
    exposedPort: 443

service:
  enabled: true
  type: LoadBalancer

  spec:
    loadBalancerIP: "192.168.7.150"

# 어차피 아무 상관 없겠지만 넣기로 했습니다.
autoscaling:
  enabled: true
  minReplicas: 1
  maxReplicas: 3
설치
helm repo add traefik https://traefik.github.io/charts

helm upgrade --install --namespace=traefik-system --create-namespace traefik traefik/traefik -f traefik_values.yml
어... 왜 host 포트 안 먹지... 아, 기본으로 host 포트를 안 먹는구나... k3s 내장 traefik 은 시스템 포트를 사용하도록 되어있었나보네요.
 k get all -n traefik-system
NAME                           READY   STATUS    RESTARTS   AGE
pod/traefik-67d45866dd-4fh9r   1/1     Running   0          8m9s

NAME              TYPE           CLUSTER-IP    EXTERNAL-IP     PORT(S)                      AGE
service/traefik   LoadBalancer   10.43.151.2   192.168.7.150   80:30168/TCP,443:30885/TCP   8m9s

NAME                      READY   UP-TO-DATE   AVAILABLE   AGE
deployment.apps/traefik   1/1     1            1           8m9s

NAME                                 DESIRED   CURRENT   READY   AGE
replicaset.apps/traefik-67d45866dd   1         1         1       8m9s

NAME                                          REFERENCE            TARGETS         MINPODS   MAXPODS   REPLICAS   AGE
horizontalpodautoscaler.autoscaling/traefik   Deployment/traefik   <unknown>/80%   1         3         1          31s
대시보드는 포워딩으로 들어가는 게 나을 것 같네요.
- https://community.traefik.io/t/traefik-pod-not-found-when-using-kubectl-port-forward-for-dashboard-access/9895
- https://github.com/traefik/traefik-helm-chart/issues/85
kubectl port-forward -n traefik-system $(kubectl get pods --selector "app.kubernetes.io/name=traefik" --output=name -n traefik-system) 9000:9000

# 아래에 들어가봅니다.
localhost:9000/dashboard/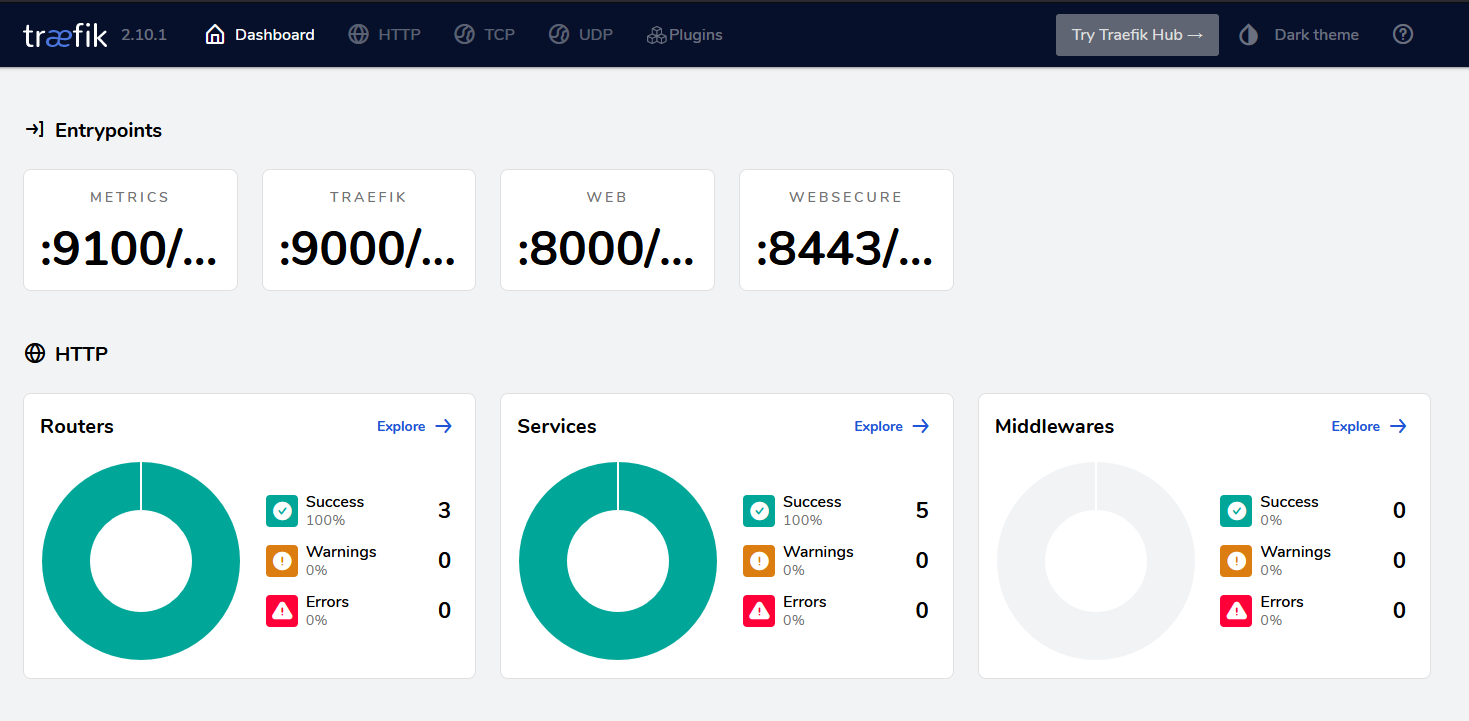
신기하네요.
내부망의 외부 IP로의 Ingress 구성
원래는 test용 pod을 올리겠지만, 저는 기존 서비스가 있는 상황이어서 해당 포트로 서비스를 만들어 매핑을 해보려고 합니다.
ExternalName 타입의 Service 리소스를 생성하고, 포트도 거기에 정의해줍니다. ExternalName에는 포트는 원래는 없는데, traefik의 경우 IngressRoute 혹은 Service 둘 중 하나 이상에 정의가 되어있어야 ExternalName이 동작한다네요.
apiVersion: v1
kind: Namespace
metadata:
  name: sftblw-moe-legacy
---
apiVersion: v1
kind: Service
metadata:
  name: sftblw-moe-legacy
  namespace: sftblw-moe-legacy
spec:
  type: ExternalName
  externalName: 192.168.7.13
  ports:
    - name: websecure
      port: 443
    - name: web
      port: 80
kubectl apply -f sftblw-moe-legacy-ingress.yml다...만 이 방법은 Ingress로 라우팅할 때에는 동작하지 않는다는 모양입니다. 정확하게는 모르겠는데, 저는 (이후 설정할 Ingress에서) 다음과 같은 에러가 납니다. 아무래도 라우팅에는 "Endpoints" 라는 리소스가 필요한 모양이네요.
Rules:
  Host        Path  Backends
  ----        ----  --------
  sftblw.moe
              /   sftblw-moe-legacy-service:80 (<error: endpoints "sftblw-moe-legacy-service" not found>)
그래서, Headless Service를 만드는 방법을 사용합니다. Service와 같은 이름의 { Endpoints 혹은 EndpointSlice (더 최신) } 을 만듭니다. 셀렉터(? 뭐지?) 가 없는 Headless Service는 EndpointSlice (혹은 구버전에서는? Endpoints) 를 자동으로 만들지 않는다네요.
https://stackoverflow.com/a/57769127/4394750
https://stackoverflow.com/a/61753491/4394750
Endpoints 사용
apiVersion: v1
kind: Namespace
metadata:
  name: sftblw-moe
---
apiVersion: v1
kind: Service
metadata:
  name: sftblw-moe-legacy-service
  namespace: sftblw-moe
spec:
  type: ClusterIP
  clusterIP: None
  ports:
    - name: web
      port: 80
---
apiVersion: v1
kind: Endpoints
metadata:
  name: sftblw-moe-legacy-service
subsets:
- addresses:
  - ip: 192.168.7.13
  ports:
  - name: web
    port: 80
    protocol: TCP
EndpointSlice 사용 (다만... traefik 은 이게 안 되나봅니다. 사유는 모르겠음...)
apiVersion: v1
kind: Namespace
metadata:
  name: sftblw-moe
---
apiVersion: v1
kind: Service
metadata:
  name: sftblw-moe-legacy-service
  namespace: sftblw-moe
spec:
  type: ClusterIP
  clusterIP: None
  ports:
    - name: web
      port: 80
---
apiVersion: discovery.k8s.io/v1
kind: EndpointSlice
metadata:
  name: sftblw-moe-legacy-service
  namespace: sftblw-moe
addressType: IPv4
endpoints:
  - addresses:
    - 192.168.7.13
    conditions:
      ready: true
ports:
  - name: web
    port: 80
    protocol: TCP
내부망의 nginx https 무한 리다이렉트 트러블슈팅
내부망에 연결하려고 하는데, 내부망의 nginx에서 http_x_forwarded_proto 가 http가 찍혀서 무한 리다이렉트가 발생한다면 아래 옵션을 사용해볼 수도 있습니다. (저 먼 위쪽의 traefik_values.yaml 끝에 추가하고 업그레이드하세요.) ip도 확인해보시고...
- traefik 옵션: https://doc.traefik.io/traefik/routing/entrypoints/#forwarded-headers
- 관련글 1: https://medium.com/@_jonas/traefik-kubernetes-ingress-and-x-forwarded-headers-82194d319b0e
- 관련글 2: https://community.traefik.io/t/eks-tls-termination-x-forwarded-for/10487, 이 외에도 많음
additionalArguments:
  - "--entryPoints.websecure.forwardedHeaders.trustedIPs=127.0.0.1/32,192.168.7.1/24,10.42.0.1/24"
  - "--entryPoints.web.proxyProtocol.insecure"
  - "--entryPoints.web.forwardedHeaders.insecure"
제 경우, 이게 문제가 아니었습니다. mastodon 이 무한 리다이렉트를 했는데,
proxy_set_header X-Forwarded-For $scheme;때문이었습니다.
로그 포맷을 바꿔 확인했구요
- nginx 프록시 모듈: http://nginx.org/en/docs/http/ngx_http_proxy_module.html
- 로깅은 어떻게? main을 넣어라: https://stackoverflow.com/questions/41528360/log-format-in-nginx-conf-being-ignored
# nginx.conf

http {
    # http_x_forwarded_proto 를 추가했습니다
	log_format main '$http_x_forwarded_for $http_x_forwarded_proto - $remote_user [$time_local] "$host" "$request" '
            '$status $body_bytes_sent "$http_referer" '
            '"$http_user_agent" $request_time';

    # main 을 추가해야 합니다
    access_log /var/log/nginx/access.log main;
}
위의 추가 수정 없이도 전부 https가 찍히더라구요.
ChatGPT의 도움을 받아, X_Forwarded_Proto 헤더가 이미 설정된 경우 그걸 사용하도록 구성했습니다.
map $http_x_forwarded_proto $proxy_x_forwarded_proto {
  default $http_x_forwarded_proto;
  ''      $scheme;
}

server {
    location @proxy {
        proxy_set_header X-Forwarded-For $proxy_add_x_forwarded_for;
        proxy_set_header X-Forwarded-Proto $proxy_x_forwarded_proto;
    }
}
cert-manager 설치
https://cert-manager.io/docs/installation/helm/
installCRDs의 CRD는 custom resource definition 으로, 인증 정보를 cert-manager가 만드는 커스텀 리소스로 정의할거라 필요합니다.
 helm upgrade --install \
     cert-manager jetstack/cert-manager \
     --namespace cert-manager --create-namespace \
     --set installCRDs=true
cert-manager의 커스텀 리소스 중 Issuer는 두 종류가 있는데, 네임스페이스 로컬인 Issuer와 클러스터 전역인 ClusterIssuer가 있습니다. 전부 LetsEncrypt로 할거니까 ClusterIssuer를 만들거구요.
LetsEncrypt의 프로덕션용 인증은 rate limit이 짜다고 합니다. 그래서 먼저 staging으로 추가해서 테스트한 뒤, production 으로 바꿔주겠습니다.
apiVersion: cert-manager.io/v1
kind: ClusterIssuer
metadata:
  name: letsencrypt-staging
spec:
  acme:
    email: myemail@example.com
    privateKeySecretRef:
      name: letsencrypt-staging
    server: https://acme-staging-v02.api.letsencrypt.org/directory
    solvers:
    - http01:
        ingress:
          class: traefik
Ingress 혹은 IngressRouter 설정
이제 리버스 프록시를 해줄 Ingress 리소스를 만들겠습니다. 더 세세한 설정이 필요한 경우 traefik 의 커스텀 리소스인 IngressRouter를 이용하셔도 됩니다.
- https://cert-manager.io/docs/usage/ingress/
- https://kubernetes.io/docs/concepts/services-networking/ingress/
apiVersion: networking.k8s.io/v1
kind: Ingress
metadata:
  annotations:
    kubernetes.io/ingress.class: traefik
    cert-manager.io/cluster-issuer: "letsencrypt-staging"
  name: sftblw-moe-legacy-ingress
  namespace: sftblw-moe-legacy
spec:
  rules:
  - host: sftblw.moe
    http:
      paths:
      - pathType: Prefix
        path: "/"
        backend:
          service:
            name: sftblw-moe-legacy
            port:
              number: 80
  tls:
  - hosts:
    - sftblw.moe
    secretName: tls-sftblw-moe-staging # < cert-manager will store the created certificate in this secret. 임의로 정해도 상관없나보네요
포트포워딩을 바꾸고 확인
기존 http/https 포트포워딩을 MetalLB가 할당한 IP로 바꿔서 잘 돌아가나 확인해봅시다.


잘 되네요. 이제 프로덕션으로 바꾸면 되겠습니다.
apiVersion: cert-manager.io/v1
kind: ClusterIssuer
metadata:
  name: letsencrypt-prod
spec:
  acme:
    email: mymail@example.com
    privateKeySecretRef:
      name: letsencrypt-prod
    server: https://acme-v02.api.letsencrypt.org/directory
    solvers:
    - http01:
        ingress:
          class: traefik
apiVersion: networking.k8s.io/v1
kind: Ingress
metadata:
  annotations:
    kubernetes.io/ingress.class: traefik
    cert-manager.io/cluster-issuer: "letsencrypt-prod"  # prod로 변경
  name: sftblw-moe-legacy-ingress
  namespace: sftblw-moe-legacy
spec:
  rules:
  - host: sftblw.moe
    http:
      paths:
      - pathType: Prefix
        path: "/"
        backend:
          service:
            name: sftblw-moe-legacy
            port:
              number: 80
  tls:
  - hosts:
    - sftblw.moe
    secretName: tls-sftblw-moe-prod
Longhorn
https://longhorn.io/docs/1.5.0/deploy/install/#installation-requirements
kubectl apply -f https://raw.githubusercontent.com/longhorn/longhorn/v1.5.0/deploy/prerequisite/longhorn-iscsi-installation.yaml
kubectl apply -f https://raw.githubusercontent.com/longhorn/longhorn/v1.5.0/deploy/prerequisite/longhorn-nfs-installation.yaml

curl -sSfL https://raw.githubusercontent.com/longhorn/longhorn/v1.5.0/scripts/environment_check.sh | bash
https://longhorn.io/docs/1.5.0/deploy/install/install-with-helm/
helm repo add longhorn https://charts.longhorn.io
helm repo update

helm upgrade --install longhorn longhorn/longhorn --namespace longhorn-system --create-namespace --version 1.5.0
https://github.com/longhorn/longhorn/blob/master/examples/storageclass.yaml
kubectl -f 아래_파일.yml
kind: StorageClass
apiVersion: storage.k8s.io/v1
metadata:
  name: longhorn-delete-single
provisioner: driver.longhorn.io
allowVolumeExpansion: true
reclaimPolicy: Delete
volumeBindingMode: Immediate
parameters:
  numberOfReplicas: "1"
  staleReplicaTimeout: "2880"
  fromBackup: ""
  fsType: "ext4"
---
kind: StorageClass
apiVersion: storage.k8s.io/v1
metadata:
  name: longhorn-delete-double
provisioner: driver.longhorn.io
allowVolumeExpansion: true
reclaimPolicy: Delete
volumeBindingMode: Immediate
parameters:
  numberOfReplicas: "2"
  staleReplicaTimeout: "2880"
  fromBackup: ""
  fsType: "ext4"
---
kind: StorageClass
apiVersion: storage.k8s.io/v1
metadata:
  name: longhorn-delete-triple
provisioner: driver.longhorn.io
allowVolumeExpansion: true
reclaimPolicy: Delete
volumeBindingMode: Immediate
parameters:
  numberOfReplicas: "3"
  staleReplicaTimeout: "2880"
  fromBackup: ""
  fsType: "ext4"
  kind: StorageClass
apiVersion: storage.k8s.io/v1
metadata:
  name: longhorn-retain-single
provisioner: driver.longhorn.io
allowVolumeExpansion: true
reclaimPolicy: Retain
volumeBindingMode: Immediate
parameters:
  numberOfReplicas: "1"
  staleReplicaTimeout: "2880"
  fromBackup: ""
  fsType: "ext4"
---
kind: StorageClass
apiVersion: storage.k8s.io/v1
metadata:
  name: longhorn-retain-double
provisioner: driver.longhorn.io
allowVolumeExpansion: true
reclaimPolicy: Retain
volumeBindingMode: Immediate
parameters:
  numberOfReplicas: "2"
  staleReplicaTimeout: "2880"
  fromBackup: ""
  fsType: "ext4"
---
kind: StorageClass
apiVersion: storage.k8s.io/v1
metadata:
  name: longhorn-retain-triple
provisioner: driver.longhorn.io
allowVolumeExpansion: true
reclaimPolicy: Retain
volumeBindingMode: Immediate
parameters:
  numberOfReplicas: "3"
  staleReplicaTimeout: "2880"
  fromBackup: ""
  fsType: "ext4"
kubectl proxy 후 아래 사이트에 접속, 설정 계속 진행
http://127.0.0.1:8001/api/v1/namespaces/longhorn-system/services/http:longhorn-frontend:http/proxy/TODO
- Total
- Today
- Yesterday
- exercism
- javascript
- C#
- mvu
- 쿠버네티스
- 개발기록
- kotlin당했다
- K8s
- OStatus
- ArchLinuxARM
- c++
- rust-lang
- vuex
- 시스어드민
- C++ FAQ
- 오라클 클라우드
- upbit
- gitea
- Oracle Cloud Infrastructure
- ActivityPub
- 토이프로젝트
- pleroma
- Sass
- 왜 생각이 안 났지
- 업비트
- pdf.js
- 오라클 클라우드 인프라
- 마스토돈
- Godot Engine
- scss
| 일 | 월 | 화 | 수 | 목 | 금 | 토 |
|---|---|---|---|---|---|---|
| 1 | 2 | 3 | 4 | 5 | 6 | 7 |
| 8 | 9 | 10 | 11 | 12 | 13 | 14 |
| 15 | 16 | 17 | 18 | 19 | 20 | 21 |
| 22 | 23 | 24 | 25 | 26 | 27 | 28 |